Handlebars and Grid-A-Licious

What is Handlebars? It’s a tool used for creating templates easily using javascript and HTML and data stored in a JSON array. This is great for sites that have pages that use the same template for multiple pages such that you can separate content from structure. While the content may change, the structure stays the same. If you can’t store data in a database, storing it in a JSON array file can be a good solution. The notation for the Handlebars template looks something like this:
{% raw %}
<div class="entry">
  <h1>{{title}}</h1>
  <div class="body">
    {{body}}
  </div>
</div>
{% endraw %}
{% raw %} As you may have guessed, the {{title}} would take the title of an entry and put it there and the body of the entry and put it in {{body}}. This clean notation makes the code easy to read and understand. {% endraw %}
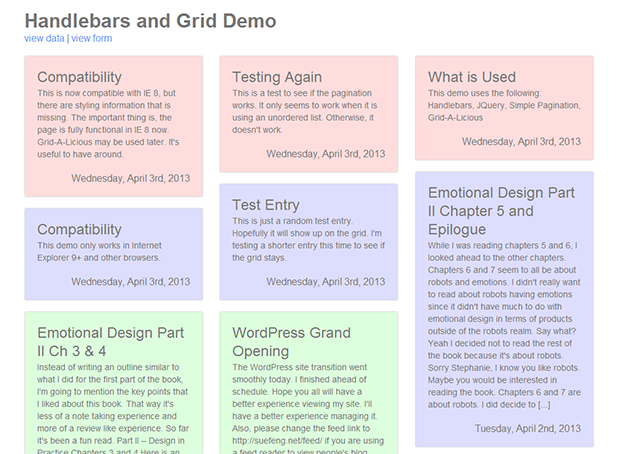
Here’s the setup for a demo. You may download Handlebars.js and try it yourself. Note though, Google Chrome, Opera, and Internet Explorer don’t allow for viewing this on your desktop, so you’ll have to put it on a server to view it or use a different browser. I know Firefox and Safari work.
Here’s the HTML page index.html:
{% raw %}
<!DOCTYPE html>
<html lang="en">
  <head>
    <title>Handlebars and Grid Demo</title>
    <!-- meta cluster -->
    <meta charset="utf-8" />
    <link rel="stylesheet" href="style.css" />
    <link rel="stylesheet" href="simplePagination.css" />
    <!-- javascript head block -->
    <script src="js/handlebars.js"></script>
    <script src="js/jquery.js"></script>
    <!--<script src="js/jquery.simplePagination.js"></script>-->
    <script src="js/jquery.grid-a-licious.js"></script>
    <script src="js/script.js"></script>
  </head>
  <body>
    <h1>Handlebars and Grid Demo</h1>

    <p class="navi">
      <a href="data/entries.js">view data</a> | <a href="form.php">view form</a>
    </p>

    <div id="content-placeholder"></div>
    <!--/#content-placeholder-->

    <script id="entries" type="text/x-handlebars-template">
      <div class="entries">
        {{#each entry}}
       <div class="entry">
       <div class="title">{{title}}</div>
          <div class="body">{{body}}</div>
        <div class="date">{{date}}</div>
        </div>
          {{/each}}
      </div>
    </script>
    <noscript><div class="entries">
        Your browser does not have JavaScript enabled. Please enable JavaScript
        to view this page. Thank you!
      </div></noscript>
  </body>
</html>
{% endraw %}
The below makes the code loop until there are no more entries. The template portion for the content of each entry is displayed within it.
{% raw %}
{{#each entry}}{{/each}}
{% endraw %}
Here's the JSON array. You may copy it and use it if you'd like. Basically, the JSON (JavaScript Object Notation) is called entry, and it has string fields called title, body, and date, with the corresponding string content. Those names have to match with the what's inside the {% raw %}{{}}{% endraw %} in the template. Handlebars generates the content in the structure and puts it inside this:
<div id="content-placeholder"></div>
The line below is used in case the user has JavaScript turned off on his or her computer.
<noscript>
  <div class="entries">
    Your browser does not have JavaScript enabled. Please enable JavaScript to
    view this page. Thank you!
  </div>
</noscript>
Also make sure your template code is inside this:
<script id="entries" type="text/x-handlebars-template">
  // enter template code here
</script>
Here's script.js, used for executing Handlebars as well as Grid-A-Licious, a script that is used to put items of varying lengths into neat columns. You may not want to download the script from their web site, since it's not compatible with Internet Explorer version 8 and below. I have a modified version of Grid-A-Licious that works in Internet Explorer 8 and below though. You can get the modified Grid-A-Licous.
$(document).ready(function() {
  "use strict";
  var source = $("#entries").html(),
    template = Handlebars.compile(source);
  $.getJSON("data/entries.js", function(data) {
    $("#content-placeholder").html(template(data));
    $(".entries").gridalicious({
      width: 250,
      gutter: 1,
      selector: ".entry",
      animate: true
    });
  }).error(function() {
    console.log("error");
  });
});
The only bit needed for executing Handlebars is this:
$(document).ready(function() {
  "use strict";
  var source = $("#entries").html(),
    template = Handlebars.compile(source);
  $.getJSON("data/entries.js", function(data) {
    $("#content-placeholder").html(template(data));
  }).error(function() {
    console.log("error");
  });
});
data/entries.js should be changed to whatever the file and location where the JSON array is stored.
Below is form.php, used to enter new entries to the entry JSON array (entries.js).
<!doctype html>
<html lang="en">
<head>
  <meta charset="UTF-8">
  <title>Handlebars Form</title>
  <link rel="stylesheet" href="style.css">
  <script src="js/jquery.js"></script>
</head>
<body>
<h1>Handlebars and Grid Demo</h1>
<p class="navi"><a href="data/entries.js">view data</a> | <a href="index.html">view index</a>
<form action="form.php" method="post">
<div class="title">Post an Entry</div>
<input type="text" name="title" placeholder="Title" class="field">
<input type="email" name="email" class="none">
<textarea cols="40" rows="20" name="body" placeholder="Post" class="field"></textarea>
<input type="submit" value="Submit" name="submit" class="button">
</form>
<?php
class entry {
    public $title = "";
    public $body  = "";
}
$doc = $_SERVER['DOCUMENT_ROOT']."/demos/handlebars/data/entries.js";
if(isset($_POST['submit']) && $_POST['email'] == "") {
  $entry = new entry();
   $entry->title = stripslashes($_POST['title']);
 $entry->body  = stripslashes($_POST['body']);
  $entry->date = date('l, F jS, Y');
 $outputstring = json_encode($entry);
    //first, obtain the data initially present in the text file
    $ini_handle = fopen($doc, "r");
    $ini_contents = str_replace('{"entry" : [', '', fread($ini_handle, filesize($doc)));
    fclose($ini_handle);
    //done obtaining initially present data

    //write new data to the file, along with the old data
    $handle = fopen($doc, "w+");
        $writestring = "{"entry" : [nt" . $outputstring . "," . $ini_contents;
        if (fwrite($handle, $writestring) === false) {
            echo "Cannot write to text file. <br />";
        }
        else { echo "<div class="entries">Success!</div>"; }
    fclose($handle);
}
?>
</body>
</html>
You may want to change this line to whatever directory path you are using:
$doc = $_SERVER['DOCUMENT_ROOT']."/demos/handlebars/data/entries.js";
The main part to remember here is json_encode();This function is used to convert the $entry object into a JSON object.
You may get the stylesheet here. Feel free to play around with the demo. You may enter new entries if you'd like.